How to test with Go
If you have spent any time learning how to program you have likely run across many references to testing. Everyone talks about testing, and everyone seems to unanimously agree that you should be testing, but what exactly does that entail?
In this post I will try to answer that question, first by explaining what tests are, and then I will dive into actually writing tests using Go. While writing tests I will cover everything from testing by writing a custom main package, to using the testing package along with it’s more complex features, such as custom setup and teardown, and creating example code that can also be used as a test case.
What is a test?
Let’s start off with the simplest question possible - What is a test?
Putting it simply, a test is a repeatable process that verifies whether or not something is working as intended. While you will most commonly hear about tests in the software world, they aren’t limited to software.
If you were buying and reselling used TVs you might have a testing process that involves plugging the TV into a laptop’s HDMI port and verifying that both the display and the audio work on the TV. That’s it.
While it might seem like tests need to be some complicated and automated process, the truth is tests can range from manually typing www.yoursite.com into your browser to verify that your deploy worked, or they can be as complicated as Google’s DiRT where the company attempts to test how all of their systems would automatically respond in the event of a zombie apocalypse. Tests are simply a way to help determine if something will work as intended in a specific situation.
In the used TV example your test is used to ensure that the TVs work when plugged into standard inputs, and in the software world your tests might be used to determine if a function does what you intended.
Writing a programmatic test
While a test doesn’t need to be, in the programming world tests are typically automated by writing more code. Their purpose is identical to any manually performed test, but because they are written in code, these tests have the added benefit that they can be performed much faster, and you can share them with other developers.
For example, let’s imagine we needed to write a function that sums up all of the integers provided in a slice and return the sum and we came up with the code below.
func Sum(numbers []int) int {
  sum := 0
  // This bug is intentional
  for n := range numbers {
    sum += n
  }
  return sum
}
Now let’s say you wanted to write some tests for this function to make sure it works as you intended. If you are unfamiliar with testing tools (and if you are reading this, I am assuming you are), one way to do this would be to create a main package that uses the Sum() function and shows an error message if it isn’t what we expected.
package main

import (
  "fmt"

  "calhoun.io/testing101"
)

func main() {
  testSum([]int{2, 2, 2, 4}, 10)
  testSum([]int{-1, -2, -3, -4, 5}, -5)
}

func testSum(numbers []int, expected int) {
  sum := testing101.Sum(numbers)
  if sum != expected {
    message := fmt.Sprintf("Expected the sum of %v to be %d but instead got %d!", numbers, expected, sum)
    panic(message)
  }
}
Note: The code above assumes that your Sum() function is in a package named testing101. If you are coding along you may need to tweak the code a bit, or do something similar to the Go Playground example.
If we run this code we will notice that our Sum() function actually isn’t working as intended, and we don’t get the expected value of 10, but instead get 6. Upon further investigation we might realize that we were using the index of where we were in a slice instead of the actual value of each item in the slice. To fix this we need update the line
for n := range numbers {To instead read
for _, n := range numbers {
After making the change, we can rerun the main() function and we won’t get any output saying that a test case is failing. That is the power of a test - within minutes we have feedback about whether our code is working or not, and we can quickly verify that our code is working as we make changes. And as an added bonus, if we sent this code off to another developer, they could also continue to run the same tests and verify that they didn’t break your code.
Testing with go test
While the approach shown above might work for a small project, it would get pretty cumbersome to have to write a main package for everything we wanted to test. Luckily, Go provides us with some great functionality in the testing package that we can put to use without needing to learn much.
To start using tests in Go, you first need to define your package that you want to test. If you haven’t already, create a package named testing101 and create the file sum.go and add the code below to it.
Note: This is the same code that we used above.
package testing101

func Sum(numbers []int) int {
  sum := 0
  // This bug is intentional
  for _, n := range numbers {
    sum += n
  }
  return sum
}
Next create a file named sum_test.go inside the same package and add the following code to it.
package testing101

import (
  "fmt"
  "testing"
)

func TestSum(t *testing.T) {
  numbers := []int{1, 2, 3, 4, 5}
  expected := 15
  actual := Sum(numbers)

  if actual != expected {
    t.Errorf("Expected the sum of %v to be %d but instead got %d!", numbers, expected, actual)
  }
}
Now we want to run our test, so navigate to the directory with your testing101 package in the terminal and run the test with the command below.
go test -vYou should see output that looks something like this.
=== RUN   TestSum
--- PASS: TestSum (0.00s)
PASS
ok    calhoun.io/testing101 0.005s
Congrats! You have just written your first test using Go’s built in testing. Now lets go into more detail about what is actually happening.
First, we have our file name. Go expects all of your tests to be files that end with _test.go, which makes it really easy to determine which files are test and which files are providing functionality when examining another package’s source code.
After looking at the file name we can jump right into the code where we have the testing package being imported. This provides us with some types (like testing.T) that provide common functionality like setting an error message when a test fails.
Next we have our function TestSum(). All tests in Go should be written in the format of func TestXxx(*testing.T) where Xxx can be any charater or number, and the first character needs to be an uppercase character, or a number.
Finally we use the testing.T object inside of TestSum() like describe above. If we don’t get the expected results, we use it to set an error that will be displayed to the terminal when we run the test. To see this in action, update the expected value to be 18 in your test code without updating the numbers variable and then ran the test with go test -v. You should see an output that shows the error message like below.
=== RUN   TestSum
--- FAIL: TestSum (0.00s)
  sum_test.go:14: Expected the sum of [1 2 3 4 5] to be 18 but instead got 15!
FAIL
exit status 1
FAIL  calhoun.io/testing101 0.005s
With everything in this section you should be able to get started with some basic tests for all of your code, but what happens if we need to add more test cases for the same function, or if we need to setup our own types to test our code?
Multiple test cases per function
In this case our code for the Sum() function is pretty simple, but as you write your own code you might find yourself wanting to add more test cases than just one for every function. For example, maybe we wanted to verify that Sum() handles negative numbers correctly as well.
There are a few options for running multiple test cases in Go. One option is to simply create another function in our sum_test.go file. For example, we might add the function TestSumWithNegatives(). This is by far the simplest approach, but it can lead to some code duplication, and we don’t have nicely nested test cases in our test output.
Instead of creating multiple TestXxx() functions, we are instead going to use the testing.T method Run() which allows us to pass in a name of a subtest that we want to run, along with a function used for the test. Open up sum_test.go and update the code to match the following.
package testing101

import (
  "fmt"
  "testing"
)

func TestSum(t *testing.T) {
  t.Run("[1,2,3,4,5]", testSumFunc([]int{1, 2, 3, 4, 5}, 15))
  t.Run("[1,2,3,4,-5]", testSumFunc([]int{1, 2, 3, 4, -5}, 5))
}

func testSumFunc(numbers []int, expected int) func(*testing.T) {
  return func(t *testing.T) {
    actual := Sum(numbers)
    if actual != expected {
      t.Error(fmt.Sprintf("Expected the sum of %v to be %d but instead got %d!", numbers, expected, actual))
    }
  }
}
What is a closure?
This example makes use of a closure, which is basically a function that is created dynamically and makes use of variables declared outside the scope of the function. This can be especially useful for creating table-driven tests - which is what we are doing. We are declaring a “table” or slice of tests and iterating over each one and running it.
Closures are used fairly commonly in Go, so if you aren’t familiar with them I highly recommend checking out my article, What is a Closure?. In it I explain what both anonymous functions and closures are (they are very similar), and then I have a followup article that dives into use cases for closures.
By using a closure we are able to dynamically set variables in our test without needing to write the same code over and over. Now if we run our tests using go test -v we will get the following output.
=== RUN   TestSum
=== RUN   TestSum/[1,2,3,4,5]
=== RUN   TestSum/[1,2,3,4,-5]
--- PASS: TestSum (0.00s)
    --- PASS: TestSum/[1,2,3,4,5] (0.00s)
    --- PASS: TestSum/[1,2,3,4,-5] (0.00s)
PASS
ok    calhoun.io/testing101 0.005s
These tests are now labeled with their input, and are nested under the TestSum test cases, making debugging any issues incredibly easy to do.
Examples as tests
One of the goals of pretty much any developer is to write code that is easy to use and maintain. To achieve this, it is often helpful to include examples of how to use your code. Go’s testing package provides functionality to help define example source code. As an added bonus, the testing package can also test your examples to ensure that they output what you expected during testing.
Open up sum_test.go and add the following to the end of your file.
func ExampleSum() {
  numbers := []int{5, 5, 5}
  fmt.Println(Sum(numbers))
  // Output:
  // 15
}
Then run your tests using go test -v. You should now see this example function in your results, but how is this being tested?
Go uses the output comments section at the bottom of an ExampleXxx() function to determine what the expected output is, and then when tests are run it compares the actual output with the expected output in the comments and will trigger a failed test if these don’t match. This makes it incredibly easy to test and write example code at the same time.
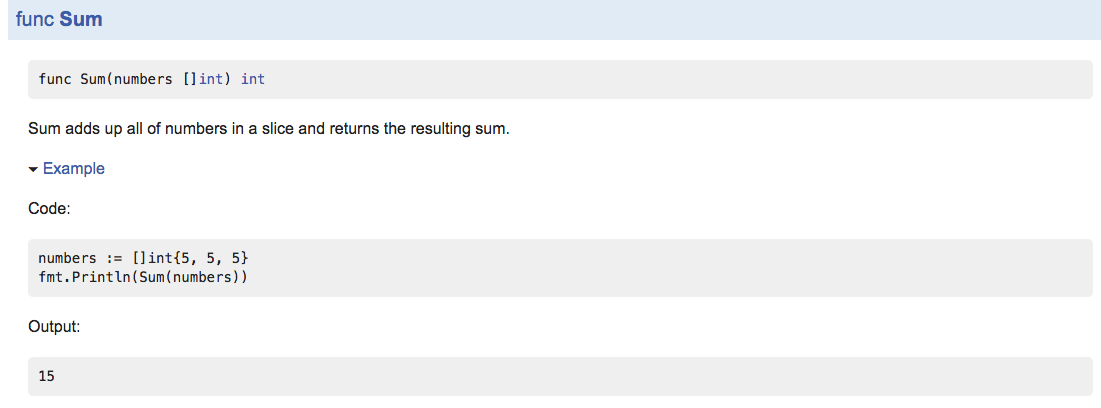
On top of creating easy to follow test cases, examples are also used to generate examples that are displayed inside of generated documentation. For example, the example above can be used to generate docs for our testing101 package that look like the screenshot below.
More complicated examples
After testing enough code and writing enough examples, you will eventually find that some tests just aren’t easy to write in a single function. One common reason this happens is that you need to setup or teardown things before or after multiple tests. For example, you might want to get a database URL from an environment variable and set up a connection to a database prior to running several tests rather than reconnecting to the database individually for each test.
To support this Go offers the TestMain(*testing.M) function which, when present, gets run instead of any tests. When using the TestMain() function you have the opportunity to insert any custom code you want before or after the tests get run, but the only caveat is that you must handle parsing flags and calling os.Exit() with the test results. This might sound complicated, but it is really only two lines of code.
flag.Parse()
os.Exit(m.Run())
Let’s look at a more complete example. Create a file named db_test.go inside of our testing101 package and add the following code to it.
package testing101

import (
  "flag"
  "fmt"
  "os"
  "testing"
)

var db struct {
  Url string
}

func TestMain(m *testing.M) {
  // Pretend to open our DB connection
  db.Url = os.Getenv("DATABASE_URL")
  if db.Url == "" {
    db.Url = "localhost:5432"
  }

  flag.Parse()
  exitCode := m.Run()

  // Pretend to close our DB connection
  db.Url = ""

  // Exit
  os.Exit(exitCode)
}

func TestDatabase(t *testing.T) {
  // Pretend to use the db
  fmt.Println(db.Url)
}
In this code we first create a global variable named db that is a struct containing a Url. Normally this would be an actual database connection, but for this example we are faking it and only setting the Url.
Next up in TestMain() we pretend to open a database connection by parsing the environment variable DATABASE_URL and setting it to the db.Url attribute. If this is an empty string we default to localhost:5432, the default port used by Postgres.
After that we parse the flags (so that the -v option in our go test -v works), and we call m.Run() and store the resulting code in exitCode so that we can reference it when we close our tests. If you don’t know much about exit status codes don’t - they aren’t important right now. Just remember that we need to store the code returned from m.Run() and use it later.
After running our tests we pretend to close our database connection by setting the db.Url attribute to the empty string.
Finally we exit using os.Exit(exitCode). This causes the current program (our tests being run) to exit using the status code we provide. Typically anything but a zero will be considered an error.
In Summary
With everything covered here you should be prepared to start writing tests for pretty much any code you write in Go, but remember that just because you CAN write a test doesn’t mean that you should. Overtesting can be nearly as bad as not testing, as it can lead to a lot of test code that needs maintained.
Determining when exactly to test, and when not to test is hard to put exact rules behind, but the article Testing like the TSA by DHH (the creator of Ruby on Rails) should help get you on the right track.
Ready to Master Testing your Go Code?
Let's face it - testing is hard. Sure, we can look at simple examples and figure out how to write tests there, but what about large, complex applications?
How do we test our models and database interactions? How do we verify our HTTP handlers are working correctly?
But what if you didn't have all this confusion? What if you got to learn by building real things, and watching someone show you step by step how to test each component and handle each tricky situation?
In my course, Test with Go, we do exactly that. We start with lessons that teach each testing technique, then jump into projects where we add tests to an existing project, and build two new projects while testing them.
Sign up for my mailing list and I'll send you a few sample lessons to check out.
