Creating the V in MVC
In this tutorial we are going to cover how to create a reusable view layer for the MVC architectural pattern using Golang and the html/template package. This includes setting up a layout with [Twitter’s Bootstrap](Bootstrap, reusing this layout with a dynamic template, and adding flash messages across our views.
This article is part of a series
This is the fourth and final part of the series, An Introduction to Templates in Go. If you haven’t already, I suggest you check out the rest of the series; it isn’t required to understand and get value out of this article, but if you enjoyed this one chances are you will like the entire series.
If you are enjoying this series, consider signing up for my mailing list to get notified when I release new articles like it. I promise I don’t spam, and as an added bonus you will get a nice sized sample from my related course, Web Development with Go.
What is a view?
Before we get started, I think it is important to take a few minutes to discuss what we are trying to create. To do this, we should start with the question, “what is a view?”
In the MVC pattern, a view is the portion of code responsible for rendering data. Typically this means rendering HTML, but your view layer could also render JSON, XML, or even text.
Views are generally only responsible for rendering data. This means that business logic is frowned upon inside the view layer, as this often leads to bugs. Instead it is common to prepare data that your view will need ahead of time in the controller, and then pass it to the view to use. This means that our view will need to provide some way for our controllers to pass data to it.
Reuse of views is also a fairly common practice in MVC apps. For example, if you have the endpoints GET /signup and POST /signup, the POST endpoint might end up rendering the same view as the GET endpoint if there is an error with the data the user provided. This means we should try to make these views reusable.
In my applications I also like to have the ability to create common layouts that will be shared across my app, and then use those inside my view layer. This isn’t a requirement in the MVC pattern, but it is incredibly helpful so we will be adding this functionality as well.
Creating a layout
While we are talking about layouts, lets jump right into creating one.
I am going to assume you have some basic knowledge of HTML and CSS, so in this section I will be mostly just providing you with HTML code without much explanation. Don’t worry though - we will stop to discuss the Go related parts. I just didn’t want to slow the tempo down with unneeded descriptions of what the body tag is 😃
First, create a folder named views, and create a folder named layouts inside of it.
# in your console
mkdir -p views/layouts
Then create a file named bootstrap.gohtml inside of the views/layouts folder and add the following code to it.
{{define "bootstrap"}}
<!DOCTYPE html>
<html lang="en">
  <head>
    <title>Calhoun.io</title>
    <link href="//maxcdn.bootstrapcdn.com/bootstrap/3.3.7/css/bootstrap.min.css" rel="stylesheet">
  </head>

  <body>

    <div class="container-fluid">
      <!-- Our content will go here. -->
      {{template "yield" .}}
    </div>

    <!-- jquery & Bootstrap JS -->
    <script src="//ajax.googleapis.com/ajax/libs/jquery/1.11.3/jquery.min.js"></script>
    <script src="//maxcdn.bootstrapcdn.com/bootstrap/3.3.7/js/bootstrap.min.js"></script>
  </body>
</html>
{{end}}

{{define "yield"}}
  <h1>Filler header</h1>
  <p>Filler paragraph</p>
{{end}}
In part two of this series we discussed using nested templates and had to create a named a template to make them work. We are doing something very similar here; we are setting up both the yield template and the bootstrap template to be nested, and later when we execute our template we will tell it to start at the bootstrap template and we will eventually define a yield template to replace the filler one here. This will all make a bit more sense after you see it in action.
Open up main.go and add the following code to it.
package main

import (
  "html/template"
  "net/http"
  "path/filepath"
)

var LayoutDir string = "views/layouts"
var bootstrap *template.Template

func main() {
  var err error
  bootstrap, err = template.ParseFiles(layoutFiles()...)
  if err != nil {
    panic(err)
  }

  http.HandleFunc("/", handler)
  http.ListenAndServe(":3000", nil)
}

func handler(w http.ResponseWriter, r *http.Request) {
  bootstrap.ExecuteTemplate(w, "bootstrap", nil)
}

func layoutFiles() []string {
  files, err := filepath.Glob(LayoutDir + "/*.gohtml")
  if err != nil {
    panic(err)
  }
  return files
}
After restarting your server you should see the bootstrap layout being rendered. Now lets go over what is going in main.go.
First lets check out the layoutFiles() function.
func layoutFiles() []string {
  files, err := filepath.Glob(LayoutDir + "/*.gohtml")
  if err != nil {
    panic(err)
  }
  return files
}
This is pretty straightforward - we are using the filepath package to glob all of the files that end with the extensions .gohtml from our layout directory. This gives us a slice of strings where each string in the slice is the path to a layout file ending in .gohtml. We only have one layout file now, but we will be adding more shortly.
Moving back to the main() function, this code should look pretty familiar. The only new thing here is that we are unpacking the slice with the ... after the slice variable name.
Variadic functions
template.ParseFiles() is a variadic function, which basically means it takes a variable number of arguments. Since we want to pass in all of our strings in the slice as our arguments, we use the ... syntax to expand the slice into individual arguments without having to type that out.
Lastly, let’s look at the handler() function.
func handler(w http.ResponseWriter, r *http.Request) {
  bootstrap.ExecuteTemplate(w, "bootstrap", nil)
}
This should also look pretty familiar with one exception - we are executing a specific template, and we pass in the name of that template as the second argument here. In previous parts of this tutorial we would instead execute the default template (whatever isn’t wrapped in a define), but we want to use the specific “bootstrap” template now.
Yielding dynamic content in a layout
We have a layout created now, and we have a yield, but what happens when we want to change the content inside of the yield template?
What we would really like to do is to have each view in our application define its own yield block which gets dynamically rendered inside of our template so that we can reuse the layout but update the content inside of it. We will start by first making that happen inside of our handler() function, and then in the next section we will add a second handler so that you can see how this works with different yield templates.
First, open up views/layouts/bootstrap.gohtml and remove the {{define "yield"}} ... {{end}} block.
Next, create the file views/index.gohtml and add the following to it.
{{define "yield"}}
<div class="container">
  <div class="jumbotron">
    <h1>Welcome to my site!</h1>
    <p>This is where I would normally ask you to sign up for something.</p>
  </div>
</div>
{{end}}
Then open main.go back up and update the code.
package main

import (
  "html/template"
  "net/http"
  "path/filepath"
)

var LayoutDir string = "views/layouts"
var index *template.Template

func main() {
  var err error
  files := append(layoutFiles(), "views/index.gohtml")
  index, err = template.ParseFiles(files...)
  if err != nil {
    panic(err)
  }

  http.HandleFunc("/", handler)
  http.ListenAndServe(":3000", nil)
}

func handler(w http.ResponseWriter, r *http.Request) {
  index.ExecuteTemplate(w, "bootstrap", nil)
}

func layoutFiles() []string {
  files, err := filepath.Glob(LayoutDir + "/*.gohtml")
  if err != nil {
    panic(err)
  }
  return files
}
I am providing the entire file here, but the only real changes are renaming the bootstrap variable to index, and then the first few lines in the main() function were changed to append the index template to the files slice, and then we use that slice when parsing files for the template.
Restart your server and you should have a bootstrap jumbotron being rendered.
Adding a second page
We now have the yield template being defined dynamically by another template file. For the index view this is done in the views/index.gohtml file. Next up we are going to add a contact page, so we are going to define the yield template for this page in the file views/contact.gohtml. Create the file and add the following to it.
{{define "yield"}}
<h1>Thanks for reaching out!</h1>
<div class="well">
  <form action="/todo">
    <div class="form-group">
      <label for="email">Your Email</label>
      <input type="email" class="form-control" id="email" placeholder="Enter your email address">
    </div>
    <div class="form-group">
      <label for="message">message</label>
      <input type="textarea" class="form-control" id="message" placeholder="Enter your message here">
    </div>
  </form>
</div>
{{end}}
Next, open main.go and add the following.
package main

import (
  "html/template"
  "net/http"
  "path/filepath"
)

var LayoutDir string = "views/layouts"
var index *template.Template
var contact *template.Template

func main() {
  var err error
  files := append(layoutFiles(), "views/index.gohtml")
  index, err = template.ParseFiles(files...)
  if err != nil {
    panic(err)
  }
  files = append(layoutFiles(), "views/contact.gohtml")
  contact, err = template.ParseFiles(files...)
  if err != nil {
    panic(err)
  }

  http.HandleFunc("/", indexHandler)
  http.HandleFunc("/contact", contactHandler)
  http.ListenAndServe(":3000", nil)
}

func indexHandler(w http.ResponseWriter, r *http.Request) {
  index.ExecuteTemplate(w, "bootstrap", nil)
}

func contactHandler(w http.ResponseWriter, r *http.Request) {
  contact.ExecuteTemplate(w, "bootstrap", nil)
}

func layoutFiles() []string {
  files, err := filepath.Glob(LayoutDir + "/*.gohtml")
  if err != nil {
    panic(err)
  }
  return files
}
The major changes between this version of main.go and the previous one are:
- We added a
contacttemplate variable. - We assigned the
contactvariable by parsing the layout files along with theviews/contact.gohtmltemplate in themain()function. - We renamed our handler functions and created a
contactHandler()function. - We assigned the
contactHandler()function to be our handler for any requests to the/contactpath.
Seeing is believing, so restart the server and check out both localhost:3000/contact and localhost:3000. You should see a jumbotron on the index page, and a contact form on the contact page, but both pages should be using the bootstrap layout. Check out the page source if you don’t believe me :).
Cleaning up our code
While creating each template individually and then executing the template in a controller will work for small applications, we want to create a view layer that can be easily reused no only in this application, but in future applications as well. That means we want to remove some of the code duplications, and we also want to try to contain some of the logic specific to rendering so that we can keep our handler functions DRY.
To do this up we are going to create our own View type that is responsible for preparing our templates for execution and then finally handles rendering them to the end user via the http.ResponseWriter. Create the file views/view.go to store our View type and then add the following code to it.
package views

import (
  "html/template"
  "net/http"
)

func NewView(layout string, files ...string) *View {
  files = append(layoutFiles(), files...)
  t, err := template.ParseFiles(files...)
  if err != nil {
    panic(err)
  }

  return &View{
    Template: t,
    Layout:   layout,
  }
}

type View struct {
  Template *template.Template
  Layout   string
}

func (v *View) Render(w http.ResponseWriter, data interface{}) error {
  return v.Template.ExecuteTemplate(w, v.Layout, data)
}

func layoutFiles() []string {
  files, err := filepath.Glob(LayoutDir + "/*.gohtml")
  if err != nil {
    panic(err)
  }
  return files
}
First we have the NewView() function, which is responsible for handling all of the work required to prepare a view. Once the view is created and prepared we return a pointer to the View object. Ideally we only want to call this function when our application is starting up, and then reuse our Views while the server is running so that we don’t waste time parsing templates over and over. The downside to this approach is that we need to restart our application every time a template changes.
Next up is the View type being defined. There isn’t anything too exciting happening with the struct itself, as it is just a container for a *template.Template and a string defining the layout to execute.
Finally we get to the Render() method. This handles executing the template using the provided data interface, and the results of the execute are sent to the http.ResponseWriter which returns the result to the end user’s browser. While this is pretty simple for now, we will expand on the responsibility of this method in the next section.
Now we need to update main.go to use our View type. Open it up and update the code to reflect the code listed below.
package main

import (
  "net/http"

  "calhoun.io/views"
)

var index *views.View
var contact *views.View

func main() {
  index = views.NewView("bootstrap", "views/index.gohtml")
  contact = views.NewView("bootstrap", "views/contact.gohtml")

  http.HandleFunc("/", indexHandler)
  http.HandleFunc("/contact", contactHandler)
  http.ListenAndServe(":3000", nil)
}

func indexHandler(w http.ResponseWriter, r *http.Request) {
  index.Render(w, nil)
}

func contactHandler(w http.ResponseWriter, r *http.Request) {
  contact.Render(w, nil)
}
Your imports may vary
You will likely need to update your import section to reflect the directory you are working in. I am currently working in $GOPATH/calhoun.io/ so my views package is located at calhoun.io/views. Your path is likely to be different from mine - many people use something like $GOPATH/github.com/:username/:repo which would mena your imports are github.com/:username/:repo/views. Don’t for to update those lines if you need to!
Viola! Our new version of main.go is much cleaner and easier to maintain without sacrificing any functionality.
Standardizing our data
As our app begins to grow it is likely that we will start to want to standardize the data we provide to our templates. For example, it is common to have access to a Flash variable on the frontend to show users flash notifications such as “I’m sorry, but we couldn’t find any users with that email address.” when a user attempts to log in with an invalid email address.
Using a session package to create real flashes is outside the scope of this tutorial, but what we can do is create a fake flashes() function in our views/view.go file to pretend like we have this functionality.
Open up views/view.go and add the following at the end of the file.
var flashRotator int = 0

func flashes() map[string]string {
  flashRotator = flashRotator + 1
  if flashRotator%3 == 0 {
    return map[string]string{
      "warning": "You are about to exceed your plan limts!",
    }
  } else {
    return map[string]string{}
  }
}
This code is basically just rotating between returning a map with the key "warning" and a message associated with it, or returning an empty map to represent the case when we don’t have any flash messages. It should return a warning flash once every 3 page loads.
Now we need to make this data available to our views. To do this we are going to create a new type - ViewData - and we will use this type to store data we provide to all views. Stay in views/view.go and add the following code.
type ViewData struct {
  Flashes map[string]string
  Data    interface{}
}
Finally we need to make use of this type in our views. Once again we will be working in views/view.go, but we will be updating the Render() method.
func (v *View) Render(w http.ResponseWriter, data interface{}) error {
  vd := ViewData{
    Flashes: flashes(),
    Data:    data,
  }
  return v.Template.ExecuteTemplate(w, v.Layout, vd)
}
We now have access to the Flashes map in all of our views, so the last thing left to do is to utilize the Flashes variable in our layout. Open up views/layouts/bootstrap.gohtml and add the following code at the end of the file OUTSIDE of your existing template.
{{define "flashes"}}
  {{range $key, $value := .Flashes}}
    <div class="alert alert-{{$key}}">
      {{$value}}
    </div>
  {{end}}
{{end}}
Then add a call to the flashes template inside of your bootstrap template. I did this inside of the container-fluid div like so.
<div class="container-fluid">
  <!-- Our content will go here. -->
  {{template "flashes" .}}
  {{template "yield" .}}
</div>
Thats it! We are ready to test it out. Restart your server and head over to localhost:3000/contact. Refresh your page a few times and you should start to see a flash message every 3 page reloads that looks something like this:
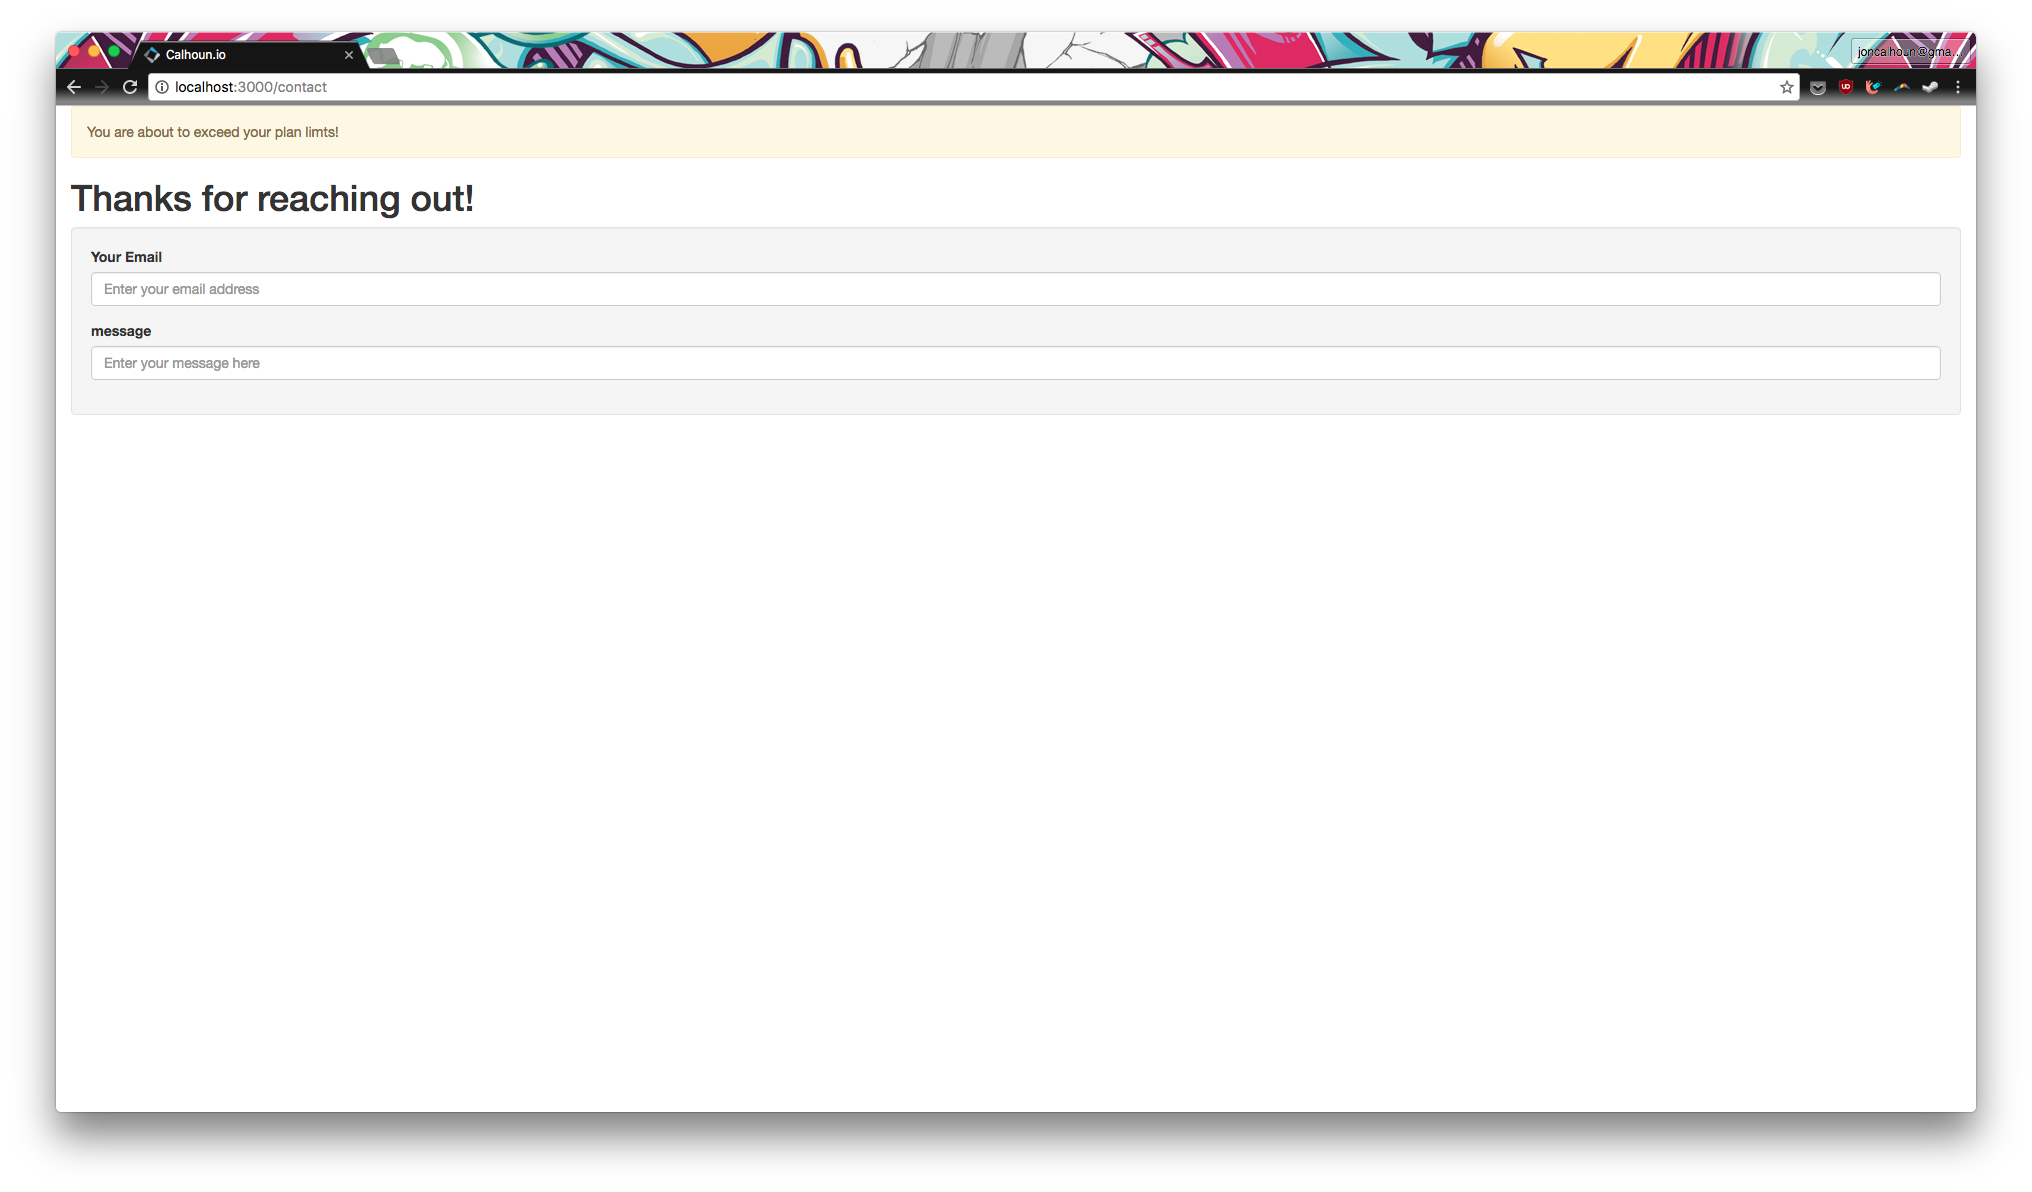
Background web requests
When coding the flashes function, if you happen to set it to show the flash message every two web request you might notice that it seems to stop working. What’s going on? Why aren’t we ever seeing a flash message? Don’t worry - everything is still working, but there are some web requests happening in the background that are causing the flashRotator variable to increment without you knowing.
Every time you load the page, most browsers will create a second web request asking for a favicon file. Depending on your browser this may vary, but for most browsers this is true. Favicons are the little icon that you see on browser tabs, and when your browser doesn’t have one for a page it will try to look one up so it can display it in the browser tab. This is typically stored at yoursite.com/favicon.ico, so even if it isn’t defined in your website meta tags, most browsers will still check that location for a favicon.
In our web application we just built, this request is being matched to the root route (/) because our router can’t find any better matches for it. When this happens, our flashRotator variable gets incremented. As you may have guessed, that means that every time we load a page we are actually making two web requests, essentially resetting any mod 2 operations.
This is why I opted to only show the flash message every three reloads - I wanted to avoid this confusion - but in reality flash messages would only be shown when you have information or errors to display to the user, so this shouldn’t make a difference on your real applications.
Continuing to build on this design
As you develop your web application, don’t be afraid to continue to build onto this design as you see fit. For example, if you generally return a User object to your frontend to display their email address and a logout button you could add a *User attribute to the ViewData, where nil means there isn’t a current user signed in, otherwise the user will be set to the *User attribute.
Also, don’t feel like you have to follow everything in this tutorial 100%! You will likely need to tweak things to match your needs, and I highly recommend adding a controller layer to wrap your views rather than creating global views in your main package, but unfortunately that was outside the scope of this article (I have to draw the line somewhere).
That’s all folks
If you followed along with the entire series you should now be a certified expert with the html/template package. Congrats!
Did you enjoy this article/series? If so, sign up for my mailing list to get notified when I release new articles like it, as well as a FREE sample from my course, Web Development with Go.
This article is part of the series, An Introduction to Templates in Go.
Want to see how templates work in the bigger picture?
In my course - Web Development with Go - we use the html/template package to build out an entire view layer for a realistic application. If you have ever wondered how all of these pieces fit together in the scope of a complete web application, I suggest you check out the course.
If you sign up for my mailing list (down there ↓over there →) I'll send you a FREE sample so you can see if it is for you. The sample includes over 2.5 hours of screencasts and the first few chapters from the book.
You will also receive notifications when I release new articles, updates on upcoming courses (including FREE ones), and I'll let you know when my paid courses are on sale.
